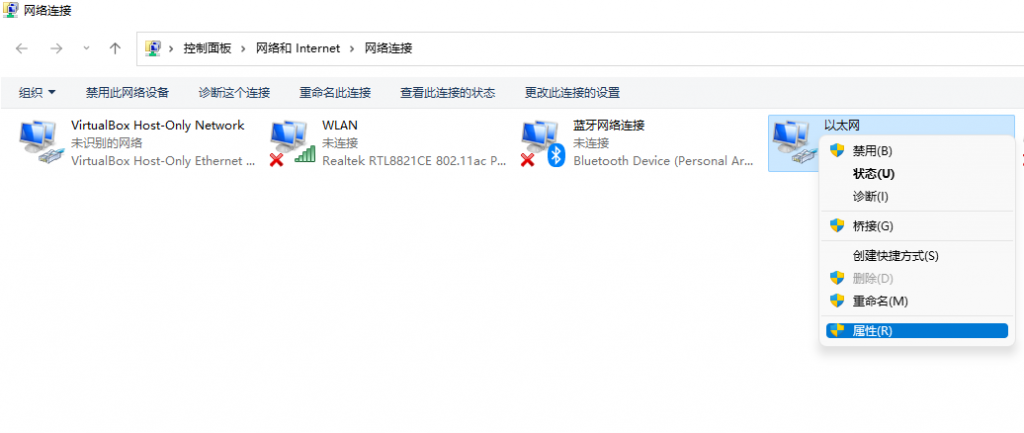
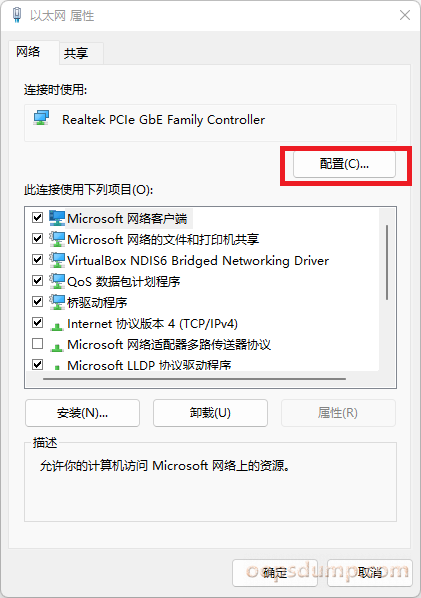
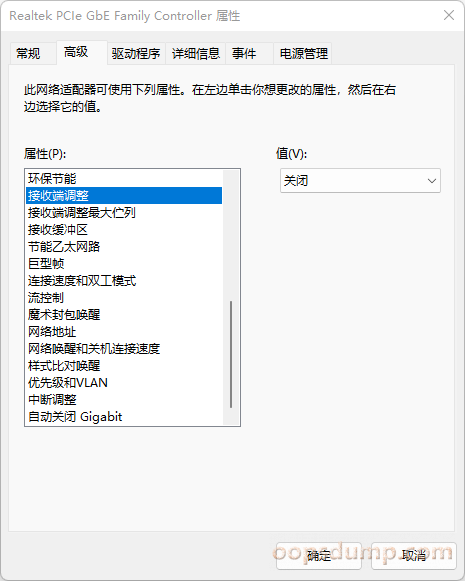
新换了台电脑,自带的系统为Win11,开始用的还挺顺利的。第二天突然有线网络工作不太正常,打开本地路由器网页都会卡死,但Ping大包都是正常的,板载的有线网卡是Realtek的,但自带的无线网卡是正常的。网上搜了一下,没有什么有用的解决办法。然后回退驱动各种实验,都没有解决。最后只能试一下更改网卡属性,把“接收端调整”关闭后,居然正常了。


新换了台电脑,自带的系统为Win11,开始用的还挺顺利的。第二天突然有线网络工作不太正常,打开本地路由器网页都会卡死,但Ping大包都是正常的,板载的有线网卡是Realtek的,但自带的无线网卡是正常的。网上搜了一下,没有什么有用的解决办法。然后回退驱动各种实验,都没有解决。最后只能试一下更改网卡属性,把“接收端调整”关闭后,居然正常了。


在Icarus Verilog官网下载最新版本iverilog版本并安装:http://iverilog.icarus.com/。安装时,要选择加入PATH。
官网下载并安装VSCode。(转载的话,请注明来自:Oopsdump.com,谢谢。)
VSCode增加中文支持:Ctrl+Shift+X(对应菜单:View->Extensions),搜索chinese,然后安装对应包。
如果还未显示中文,使用Ctrl+Shift+P,搜索lang,选择Configure Display Language,再选择zh-cn。
VSCode中安装支持对应的verilog包:Ctrl+Shift+X(对应菜单:View->Extensions),搜索verilog,安装Verilog HDL/SystemVerilog。
上述包需要ctags支持,下载并安装windows对应的ctags:https://github.com/universal-ctags/ctags-win32。打开文件->首选项->设置,再选择扩展->verilog configuration。修改verilog.ctags.path为ctags的目录地址,如C:\Oopsdump_Com_Apps\ctags。修改verilog.linting.linter为iverilog。
可以自动生成testbench:Ctrl+Shift+X(对应菜单:View->Extensions),搜索testbench,安装 Verilog_Testbench。该功能是python的脚本,需要python环境,可安装python3,并且在安装时,选择加入PATH。然后打开Win+X运行cmd,运行命令:pip3.7 install chardet,安装必要的包。
使用Ctrl+Shift+P,搜testbench,就可以自动生成测试了。
使用Ctrl+Shift+P,搜索verilog,可以使用Rerun lint tool和Instantiate Module功能。
如果遇到:”Cannot read property ‘logger’ of undefined”,如果你的Verilog HDL/SystemVerilog版本是1.0.4,请退回的1.0.3版本,方法就是扩展管理器,该扩展的菜单里选“安装另一个版本…”。
iverilog的基本使用:
# iverilog -o test_module.vvp test.v
# vvp test_module.vvp
也可以使用下面批处理文件:
@echo off

rem 若没有设置路径到PATH则关闭以下注释
rem set iverilog_path=c:\iverilog\bin;
rem set gtkwave_path=c:\iverilog\gtkwave\bin;
rem set path=%iverilog_path%%gtkwave_path%%path%

set testbentch_module=hello_world_tb
set testbentch_file="./%testbentch_module%.v"

iverilog -o "%testbentch_module%.vvp" %testbentch_file%
vvp "%testbentch_module%.vvp"

set gtkw_file="%testbentch_module%.gtkw"
if exist %gtkw_file% (gtkwave %gtkw_file%) else (gtkwave "%testbentch_module%.vcd")
参考链接:
Icarus Verilog和GTKwave使用简析:https://blog.csdn.net/husipeng86/article/details/60469543